The Beginner’s Guide to EDC Flashlights
Experts on all things EDC, the folks behind Everydaycarry.com shed some light on the world of flashlights with “The Beginner’s Guide to EDC Flashlights”, kindly republished with permission below…
So you want to carry a flashlight… You’ve considered your needs, you’ve drooled over other people’s EDCs, and you’ve been left in the dark one too many times for your liking. But after shopping around and browsing different lights, you’re suddenly bombarded with acronyms, numbers, graphs, and more numbers. You might know some of those words, like lumens or titanium, but flashlight spec pages may as well be hieroglyphics when translating numbers into the experience of using your next EDC flashlight. So, what does it all mean?
In this Carry Smarter guide, we shine some light on an essential but nevertheless poorly understood tool: the flashlight. We’ll explain torches and how they work piece by piece, and fill you in on how each component and feature can work for you. By the end of this tutorial, you’ll be able to read a product page or spec sheet and speak the language like a true flashaholic.
Table of Contents
Modern flashlights have come a long way, innovating and advancing every year. Unfortunately, the resources out there that explain flashlights haven’t kept up. This primer won’t explain everything, but it will cover the most important things you should know in simple terms to save you the headache of lurking through dozens of old webpages with outdated information. With that said, it will be long, so here is a quick table of contents to help you navigate to the answers you’re looking for:
The Head: Bezels, lenses, and reflectors
The LED: Understanding model numbers, lumens, tint colors
The Beam: Hotspot and spill, throw vs. flood
The Body: Materials, batteries, knurling, threads
The Tail: Switches, carry options, tailstanding
The Head
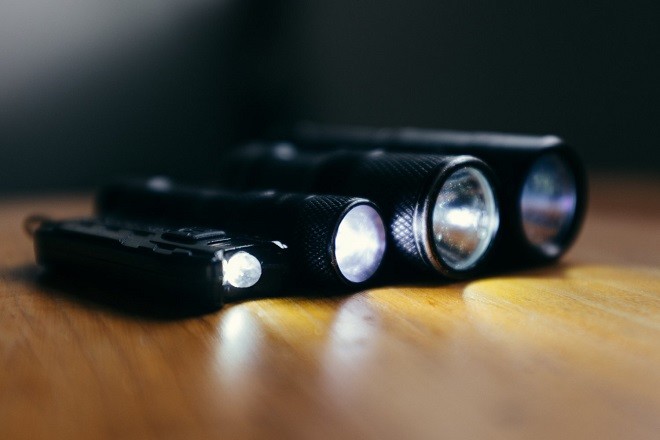
At the business end of a flashlight, you’ll find the bezel, lens and reflector (sometimes referred to as the optics), and the LED itself, collectively referred to as the head.
What’s a bezel? What does it mean if a bezel is scalloped?
The bezel of a flashlight is the outermost ring meant to protect the lens. Many flashlights just extend the material of the head past the lens to act as a bezel, while more heavy duty ones use a tough stainless steel insert. You might see some lights boast a “scalloped” (sometimes “crenelated”) bezel, which means the bezel has curved notches cut into it. Depending on how severe the notch pattern is, the bezel can be used for self defense. Otherwise, it lets some light leak through when a light is propped “face down,” letting you know if the light is still turned on to avoid wasting battery or to have some hands-free lighting.
What’s the lens for? What do different lenses do?
The lens is a small window that protects the bulb and allows light to pass through. Most common flashlights have flat lenses that don’t do much to alter the beam. For more specialized lights, lenses and optics play a much larger role. Adjustable lenses allow for focusable beams, frosted lenses create a softer, floodier beam, and aspherical lenses create a much further-reaching beam, just to name a few.
What is a reflector, and why should I care about its shape and texture?
As its name implies, the reflector reflects light from the LED into a focused, usable beam. They’re largely responsible for the shape and quality of the beam. Reflectors vary in size, shape, and texture, but they mostly work like a lamp shade does. There are three main types of reflectors in common EDC lights:
Smooth reflectors are by far the most common type, made of polished metal or reflective plastic. Good smooth reflectors offer better throw. Lower-quality smooth reflectors are prone to having spot imperfections that actually appear in the beam, referred to as “artifacts.” Sometimes smooth reflectors cause “ring” patterns in the beam as well.
Textured reflectors may have the popular “orange peel” pattern or a more uniform faceted one, but they both result in a floodier, higher quality beam by using the multiple facets to smooth out imperfections in the beam.
The term “mule” is the flashlight community’s way to describe a light with no reflector whatsoever. This produces a less focused, pure flood beam that bathes an area with light, rather than concentrating light at the center of the beam.
The LED and Related Info You Should Know
The LED (light-emitting diode) produces light when voltage from a battery is applied. This is one of the most important factors to consider when choosing a light, but unfortunately, one of the hardest to understand. Two manufacturers of LEDs you will invariably come across are Cree (sometimes you’ll see this capitalized as CREE — but don’t worry, it’s not another initialism to learn), who produce many of the modern LEDs on the market, and Nichia, who specialize in LEDs with high CRI (that’s color rendering index, or the measure of how faithfully the light shows colors compared to a natural light source).
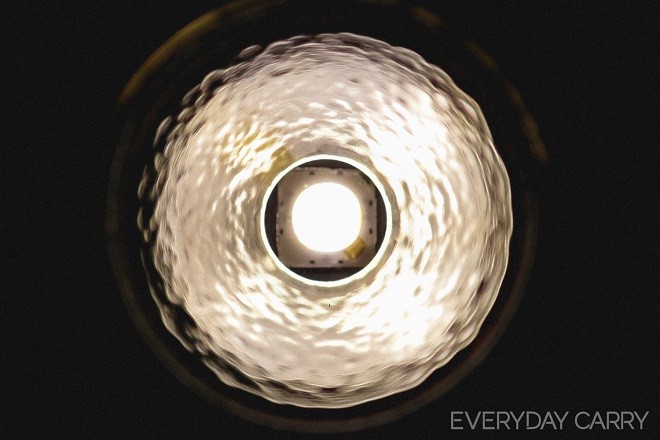
The LED isn’t a single piece, it’s more like an assembly of parts crammed into a space-efficient package. The yellow square you see is called the “die,” which actually emits the light. Different LEDs have differently sized dies. Larger dies tend to put out more light (they have more light-emitting surface area) and create a wider, floodier beam, whereas smaller dies put out less light overall, but have intense beams that throw farther.
What do all the letters and numbers describing an LED mean? What’s the difference between an XP-G2 R5 and an XM-L U2?
Cree LEDs follow a particular naming pattern that isn’t the most intuitive at first, but makes more sense when you break it up into parts. The naming scheme goes a little something like:
(Model Number)(Version) (Bin)
The first part is like a model number. XP-G and XM-L are different LEDs altogether. So are XP-G and XP-E.
If a certain LED has a newer version with better performance but the same physical specs, it’ll be denoted after the model number. For example, the XP-E2 is the newer version of the XP-E.
The last piece of the puzzle is the “bin.” Bin is a classification used to categorize them according to specific attributes, namely luminous flux (brightness), tint, Vf (forward voltage), and color. During LED manufacturing, it is used in the literal sorting of LEDs based on their quality and performance.
Bin sequencing assigns a letter and a number — usually (not always) the further into the alphabet and higher the number, the brighter that LED is. Comparing an XM-L2 T6 to an XM-L2 U2, the U2 is brighter. The letter takes precedence here, so even though the T6 has a higher number, it’s not as bright as the next letter down with a lower number.
Rare — also known as “top” — bins are usually the best quality and highest-performing LEDs, making them more desirable, and thus more expensive. Some manufacturers like to use this as a selling point for their flashlights, marketing them as using only top bin LEDs.
What do the number of lumens in a light mean? What’s the difference between LED lumens and OTF lumens?
A lumen is a unit measure of the total amount of visible light emitted by a source, in this case the flashlight. It follows that more lumens equals more power, but beware! Some manufacturers misrepresent or miscalculate the lumens their lights produce, opting to publish the maximum potential output of an LED (calculated with ridiculously unreasonable or unsafe voltages) rather than the actual light emitted out the front of the light, or OTF. Look instead for lumen values calculated against the American National Standards Institute (ANSI) standard, a generally more accurate and reproducible standard of measurement used by the flashlight industry.
What’s the difference between Cool White, Neutral White, and Warm? Why should I care about the tint of a light?
One other thing to consider when picking a light is the “tint” of the LED. This refers to the color temperature of the beam.
Most common lights are “Cool White,” which produce beams that are relatively more blue and purple against a white wall. These tend to wash out colors and are better suited for use in urban or indoor environments.
On the other end of the spectrum are “warm” lights, which are more yellow and resemble old incandescent bulbs. These fare better for outdoor applications when illuminating the greens and browns from dirt, trees, and other foliage.
Then there’s neutral white tints, which are not too hot and not too cold, offering a more “natural” tint and generally better CRI.
Putting It All Together: Understanding Beam Profiles
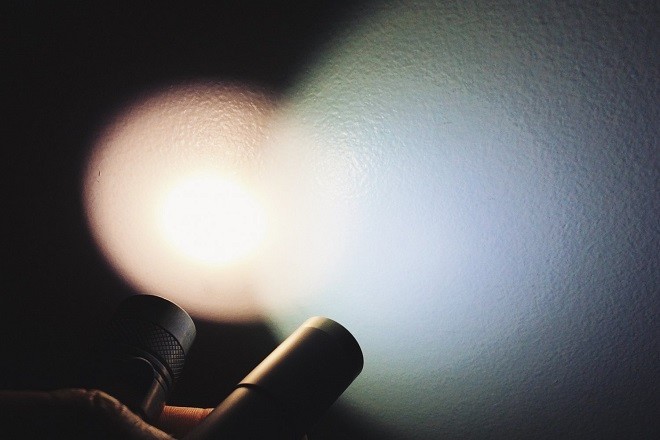
The beam is what you carry your light for. It’s the real usable byproduct of the light. So it’s important to understand the beam and the factors explained above that affect it to find the right light for your uses. A beam’s profile is easier to understand when you shine it against a white wall, as you can more clearly see its character.
In this photo, you can see a stark contrast in the beam patterns of the two lights. On the left is a neutral white LED light with an orange peel reflector, and on the right is a cool white LED without a traditional reflector.
Beam anatomy: What’s a hotspot? What’s spill?
Typical modern flashlights with the usual flat lens and reflector produce a beam that’s concentrated at its brightest in the center, or “hotspot,” with a much larger and less intense surrounding ring called the “spill.” The transition area around the hotspot going into the spill is sometimes called the “corona.”
What does “throw” mean? What’s “flood?”
Throw refers to the distance the beam travels to still effectively illuminate an object. “Throwy” lights tend to have higher beam intensity, “tighter” hotspots and larger, deeper reflectors to let the beam really go places. If you’re exploring caves or find yourself in dark open areas, this is the spec you want to look for. You might see units like lux and candelas in spec sheets — simply put, these measure light on a given area and can tell you how intense and far-reaching the beam can be.
Flood refers to the area illuminated by a light. A beam that’s “floody” usually doesn’t go as far, but it bathes a wider area, allowing you to see more of your up close surroundings. You’d usually find shallow reflectors (or none at all) and larger die LEDs. Floody lights work well as task lamps or short-range navigation as opposed to search applications like a throwy light.
The Body
The body of the light stores the battery, and it’s the portion you’d actually grip and hold onto for the most part. It dictates whether a light is pocket-friendly and comfortably usable, so it’s just as important to know what you’re getting your hands on.
What are threads, and why are they important?
Screw threads are what connect most flashlight heads and tails to the main body. Threads play an important role in the operation and use of many lights that involve twisting or tightening of the head. Square-shaped threads are ideal for most EDC lights, as they have the least friction compared to other thread types. You’ll want smooth turning threads for a predictable, reliable operation every time.
Which material should my flashlight be made of? What are the differences between the types?
The material used to make a flashlight’s body not only determines its weight and aesthetics, but also affects properties like heat dissipation, corrosion resistance, and more.
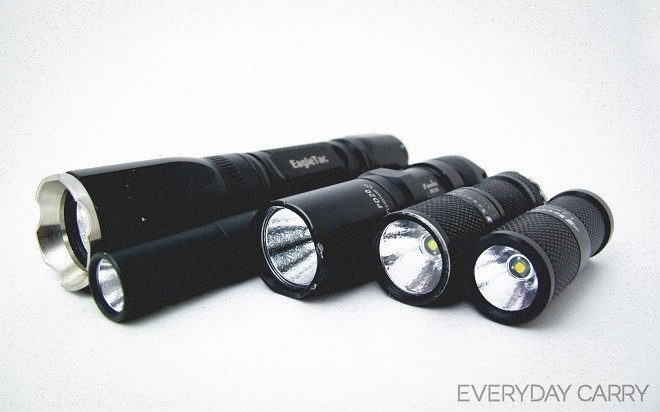
Aluminum is widely available, lightweight, strong, and a good conductor of heat away from the LED, making it a popular choice of flashlight material. You might see aluminum lights touted as “hard anodized.” Anodization is the process of oxidizing a metal to produce a coating (aluminum oxide) that’s significantly more durable and resistant to corrosion, allowing performance in most environments.
Stainless steel is a harder metal than aluminum, but at the cost of heavier weight. Despite this, it’s a popular choice for flashlights due to its luster and high resistance to wear.
Titanium as a metal offers several practical benefits, but for flashlights in particular it offers a good balance of form and function. Though slightly heavier than aluminum, it is stronger and has more variety in appearance. Titanium can be polished, bead blasted, and even colored with anodizing or heat treatment.
Brass, copper, and other exotic metals make an appearance in a select few lights. Brass and copper in particular develop a patina over time, which some owners find desirable. While generally used for aesthetics, these two materials (as brass is an alloy of copper and zinc) also have high thermal conduction for better heat management and high corrosion resistance that allows them to remain attractive.
What is knurling?
Knurling is a manufacturing process in which patterns of lines and grooves are cut or rolled into the body of a flashlight. It aids with grip, particularly with twisty activation mechanisms, and adds a nice visual and tactile texture to a light. “Aggressive knurling” is a term you may come across, and usually used to describe unique or multiple patterns that cover most of a light for looks and grip.
What kind of battery should my flashlight use?
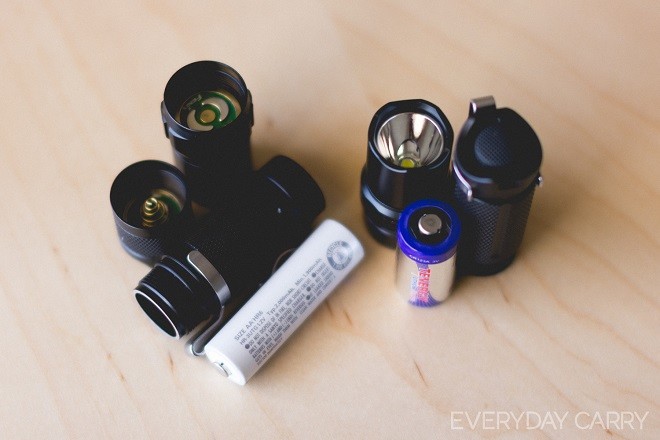
The size, runtime, and brightness of a light are largely dictated by the battery (or batteries) inside it. In general, the most common types of batteries you’d see are AAA, AA, CR123A, and 18650. When compactness is a priority in an EDC light, you’d typically opt for a light that takes only one battery (1xAA, 1xCR123A, etc.) as opposed to dual-cell lights (2xAA, 2xCR123A). Of these common types, AAAs are the most compact and 18650 cells are the bulkiest.
Check out our previous article comparing the two common EDC light batteries, CR123As and AAs, to find the right configuration for you.
More advanced lights can take advantage of rechargeable lithium-ion batteries, which we’ll elaborate upon in a future update.
The Tail
The two main things to keep in mind about this end of the light are the switch (on lights that use it) and the rear bezel that protects it. Other important features, like a pocket clip, lanyard hole, and tailstanding can depend on the tail.
What are the different types of switches used to turn on a light?
Using a flashlight should be easy and convenient, and this boils down to how you turn it on and navigate its modes. Thinking about how you hold and use your light will help you choose which switch is best and most comfortable for you.
Twisty: Twisty activation is used in lights where length is a premium, particularly for smaller or keychain-based lights. It’s a simple matter of screwing a light’s head on to make contact with the battery and activate it, and screwing it off to disconnect and turn it off.
Rear clicky: Most lights use a rear “clicky” switch for activation and navigation, and it usually comes in two forms. A forward clicky means a light turns on with the switch partially depressed (also known as “momentary on”), and staying on once fully clicked, while a reverse clicky means a light only turns on once the switch is fully depressed, clicked, and released.
Side switch: Side switches allow the use of a discrete button while saving some length on the light. This type of switch is also ideal if you prefer an overhand (thumb facing forward) grip when using your light.
What are my options for carrying my flashlight?
Depending on a light’s size, weight, and features like switch position these options may differ or interchange, so make sure they work well with your EDC.
Pocket Clip: The most common carrying method for flashlights is the ever-reliable clip. In some cases it can be interchangeable to allow for both head up or down carry by attaching somewhere on the barrel of the body. In most cases it will be tip down, screwed or attached towards the light’s rear.
Holster: Many production lights, especially larger ones using multiple batteries, also come with a holster to make belt or bag attachment possible with Velcro straps or D-clips. The holster also doubles as protection for the light when not in use.
Lanyard holes: For smaller flashlights there may be drilled holes or spaces on their tail to allow attachment of lanyard straps. This makes it possible to conveniently carry the lights around your neck or on your keychain.
What should I know about the rear bezel? What’s tailstanding?
Some lights have a ring or bezel on the tail to prevent the switch from getting accidentally bumped and turning on in your pocket, draining battery for when you aren’t even using it. Rings that go all the way around the switch provide a flat, even surface to let the light “tailstand,” or stand straight up to point at the ceiling. This lets you bounce light off the ceiling to use as an emergency candle. Like front bezels, some rear bezels are scalloped to allow slightly easier thumb access to the switch at the expense of stability during tailstanding.
–
Words by Mikey Bautista and Bernard Capulong


 Carry Awards
 Insights
 Liking
 Projects
 Interviews
