How to Clean a Backpack
Muddy outdoor adventures, travel dust and grime, and general day-to-day dirt can leave their mark on your backpack. But with some simple TLC you can restore your bag to its former glory. Discover how to clean a backpack below…
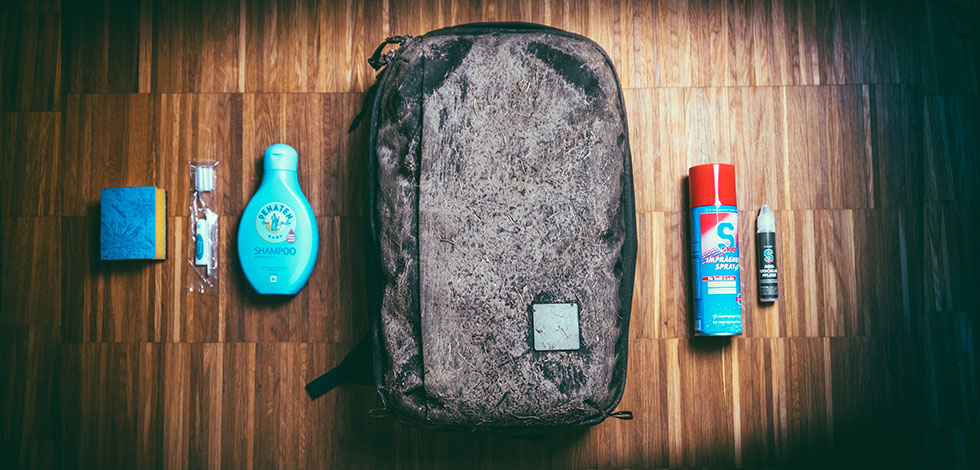
Let’s go over all of the items that you will need to clean the backpack. You will need baby shampoo, a sponge with a soft and a rough side, a toothbrush (I usually use the free ones that you get on the plane), waterproofing spray (this is actually for motorcycle clothing but also can be used for bags) and to take care of the zipper lubricant that can usually also be found for motorcycle clothing.
The first thing you want to do before you start cleaning the bag with your sponge, your soap and your toothbrush is to just shower off all the bigger chunks of dirt and debris. Using the shower actually helps to get rid of most of the debris and the dirt and now we can start using the soap to clean off or properly clean the bag.
So to clean the backpack I like to use baby shampoo and you might ask yourself why baby shampoo and not something more effective like dish soap or any other soap for that matter and that’s actually because baby shampoo is very mild but still effective. I actually also use baby shampoo for cleaning the inner linings of my motorcycle helmet. With bags sometimes you don’t know if there are any delicate or treated materials that might get damaged by heavy-duty soap for instance; that is why I like to use mild soap to make sure that none of the material of the bag gets damaged.
Furthermore, as I said I use a sponge with a soft side and a rough side and that way you can softly clean the bag with the soft side and if you have some patches of materials that you can clean a little bit rougher then you can obviously use the other side.
I use the soft side of the sponge to clean the bag and don’t use the rough side so I don’t damage any of the materials. I will clean the zippers afterwards with a toothbrush. I just go over all the bag and clean everything that is dirty and hopefully the bag will be brand new afterwards. It is important to shower off most of the dirt beforehand so you don’t make any scratches. If you have stones or bigger debris on here then you might scratch the surface or worst-case scenario if it’s a sharp stone you might cut some of the fabric.
So how do you know that the bag is actually clean? Well hopefully you can see it obviously but if the material is dark then the soap is actually a good indicator. If the soap is still dirty then obviously the bag or the fabric still has some dirt inside so just keep scrubbing the bag until the soap is basically more or less clean. From time to time it’s a good idea just to rinse off some of the soap and start all over again with brushing the dirt off.
Before we can start cleaning the inside of the bag we will start with cleaning the zippers, which we do with the toothbrush. Once in a while rinse off the dirt so you don’t brush dirt into the zippers, so basically rinse and repeat. Once we clean the outside of the zippers we can carefully open up the zipper to clean the inside of the zippers. I say carefully because if you open up the zippers too forcefully or too fast then there is the possibility that you can damage the zipper or bend one of the teeth of the zipper. While I’m cleaning the inside of the zipper let’s also go ahead and clean the inside of the compartment as well. Also always rinse the bag in between.
Once you wash the bag and rinse it properly to get rid of all of the soap you want to hang up the bag and air dry the bag. Don’t put it on a heater or in direct sun or even use a hairdryer because you don’t want to damage any of the fabrics or hardware on the bag. So just hang it up inside your shower or any other place in your house or apartment and just let it dry for a couple of days or hours. That being said, depending on where you live this can take a longer or shorter period of time so keep that in mind when you want to clean your bag because obviously if the bag is wet you can’t use it and therefore it might be a good idea to only wash it in the summer because it will dry faster and maybe during your vacation when you don’t need the bag for work, for instance.
Once the bag is finally completely dry, before we can use it we need to take care of the material and the zippers to maintain the quality of the bag for a very long time and give it a little bit more protection. So to take care of the bag after it has been washed we need to lubricate the zippers as they are a mechanical item. So to keep those parts working properly for the future we need to lubricate with a zipper lubricant which I got from a motorcycle store and it’s supposed to lubricate the zippers of a motorcycle jacket or zippers on motorcycle boots. Although it is made for jackets or clothing we can obviously also use it on our zippers for the bag. Furthermore, we use this waterproofing spray to improve water resistance of the bag but additionally waterproofing spray is supposed to have anti-static properties so in theory we can keep dog hair and cat hair away from the bag.
The instructions tell you to close the zipper and then apply it to the outside of the zippers but since this backpack has the zippers turned inside out or if you have a backpack with stormguard zippers you need to open the zippers and apply the lubricant to the inside of the zippers. What I like to do is to apply the lubricant all over the zippers and then you just need to distribute the lubricant by closing and opening the zippers a couple of times. Then for good measure I just use a lubricant on the closed zipper from the outside of the bag and then repeat this on all the other zippers.
When you finish taking care of the zippers then go outside or at least to a very well-ventilated room and then use the waterproof spray on your backpack. Beware that some fabrics might get some discoloration depending on the spray that you’re using, therefore test the spray first on an area that might not be that visible like on the bottom or on the back side of the bag. As soon as you’re certain that the spray doesn’t change the color of your bag or fabric then just go ahead and spray down the bag all over to make sure that every part is covered by this waterproofing spray.


 Carry Awards
 Insights
 Liking
 Projects
 Interviews
